" "

Pita Pizzas

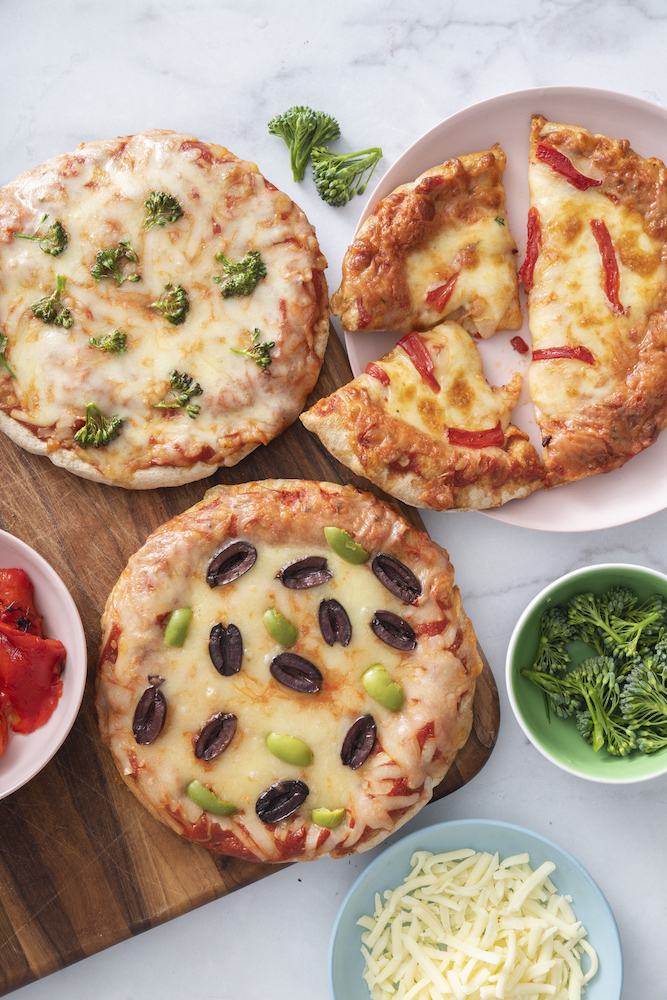
Pita Pizzas are a quick and family-friendly way to enjoy homemade pizza without making dough from scratch. Whole wheat pitas create a crisp, sturdy crust, while a simple seasoned tomato sauce and melted mozzarella deliver classic pizza flavor in just minutes. This recipe is easy to customize with favorite toppings, making it perfect for busy weeknights, lunch, or pizza night at home.

The “Friday-Night” Pita Pizza

When you’re tasked with reinventing the standard pizza night for a healthy, “budget-friendly” family dinner, sometimes the best solution is to ditch the expensive, greasy delivery boxes entirely. This Pita Pizza uses a simple flatbread base and fresh toppings to create a restaurant-quality slice right at home. It’s a “wholesome” twist that had the in-house testers absolutely thrilled—to the point where one could barely hear a muffled “more olives please” through bites of cheesy, savory goodness!

Why This Recipe Wins

  • Customizable Power: By incorporating a variety of fresh toppings directly onto personal pitas, the meal provides a “filling and tasty” boost of veggies that satisfies everyone’s individual cravings.
  • Friday-Night Surprise: Moving away from a “standard greasy delivery routine” makes a quick weeknight dinner or school lunch feel like a “special holiday” treat.
  • Naturally Budget-Friendly: Using simple pantry staples and leftover vegetables provides a “rich yet robust” flavor profile without the expensive takeout price tag.
  • Lightning-Fast Ease: These “personal-sized portions” can be cooked up in minutes, making them an ideal choice for a stress-free family pizza night.

What You’ll Need

  • The Perfect Base: Round pita breads to serve as a quick, sturdy, and perfectly portioned crust.
  • The Savory Sauce: Your favorite marinara or pizza sauce to build a rich tomato foundation.
  • The Melty Center: Shredded mozzarella cheese (or a dairy-free alternative) for that classic pizza pull.
  • The Fun Toppings: Sliced olives, roasted broccoli, red peppers, onions, mushrooms, or any fresh veggies you want to pile on top.

How to Make It

  • The Base Prep: Lay the pita breads flat on a baking sheet to create a “perfectly crisp” canvas for your ingredients.
  • The Sauce: Spread the marinara sauce evenly across the pitas, ensuring it covers the base “thoroughly, but gently” without soaking the edges.
  • The Cheese: Sprinkle a generous layer of shredded cheese over the sauce until it looks beautifully “velvety smooth.”
  • The Toppings: Add your sliced olives and roasted veggies evenly across the cheese layer.
  • The Bake: Pop the baking sheet into a hot oven until the cheese is melted, bubbly, and slightly “golden-brown.”
  • The Plate: Slice into perfect triangles and serve immediately alongside a big salad platter for a cheesy, “mess-proof” masterpiece!

Get the Kids Involved: The “Pizza Picassos”

Since this meal is entirely customizable and heat-free during prep, this is a “ton of fun” for kids to help assemble and enjoy.

  • Ages 3–5: Let them be the “Olive Droppers.” They can help scatter the sliced olives over the cheese, practicing their “precision.”
  • Ages 6–9: Have them help as “The Sauce Spreaders.” Show them how swirling the red sauce over the pita creates a “scrumptious” and even foundation.
  • Ages 10+: Let them lead the “Oven Watch.” Under supervision, they can safely monitor the baking process through the oven window and look for the “magic melt” that signals the cheese is perfectly bubbly.

Tips for Success

  • Topping Balance is Crucial: If you overload the pita with too many heavy or wet toppings, the crust will become soggy. Keeping the layers balanced is imperative to achieve that “tender and rich” but beautifully crispy slice.
  • Pre-Baking Matters: The goal is a sturdy crust, so if your pitas are particularly thin, toasting them bare for a minute before adding sauce ensures a “refreshing and light” crispness that holds up to the veggies.
  • The Lunchbox Trick: One can make a “huge batch” of these pita pizzas the night before and let them cool completely.

School Lunch Note: Pack a few cold slices of Pita Pizza in their lunchboxes! The kids will absolutely love opening up their lunch to this “quick and easy” midday surprise.

  • Variation: For a “decadent and indulgent” twist, drizzle the baked pitas with a balsamic glaze or add dollops of creamy ricotta cheese and fresh basil before baking to elevate the flavor profile even further.

Serve & Savor

The Pita Pizza is a “tantalizing taste sensation” that proves homemade pizza night can be “out of this world” fast and delicious. It’s a “versatile” recipe that turns a simple flatbread into a “memory-making” family tradition.

Print
clockclock iconcutlerycutlery iconflagflag iconfolderfolder iconinstagraminstagram iconpinterestpinterest iconfacebookfacebook iconprintprint iconsquaressquares iconheartheart iconheart solidheart solid icon

Pita Pizzas

5 Stars 4 Stars 3 Stars 2 Stars 1 Star

No reviews

Pita Pizzas are a quick and family-friendly way to enjoy homemade pizza without making dough from scratch. Whole wheat pitas create a crisp, sturdy crust, while a simple seasoned tomato sauce and melted mozzarella deliver classic pizza flavor in just minutes.

This recipe is easy to customize with favorite toppings, making it perfect for busy weeknights, lunch, or pizza night at home.

Ingredients

Scale
  • 1 cup tomato sauce
  • 1/2 teaspoon garlic powder
  • 1/2 teaspoon Italian herbs
  • 1/2 teaspoon kosher salt
  • 1 cup shredded mozzarella cheese
  • 4 whole wheat pitas (mini or regular)
  • 1/3 cup sliced black olives
  • Favorite pizza toppings of choice

Instructions

  1. Preheat the oven to 400°F.
  2. In a small bowl, stir together the tomato sauce, garlic powder, Italian herbs, and salt.
  3. Place the pitas on a foil-lined baking sheet.
  4. Spread about 1/4 cup of the seasoned sauce over each pita.
  5. Sprinkle each with about 1/4 cup of mozzarella cheese.
  6. Top with sliced black olives and any additional favorite toppings.
  7. Bake for about 10 minutes, or until the cheese is melted and bubbly.
  8. Slice and serve warm.

Notes

  • Customize every pizza: Use any combination of vegetables, meats, or cheeses to suit everyone’s tastes.
  • Don’t overload the toppings: A lighter layer helps the pita stay crisp while the cheese melts evenly.
  • Mini or regular pitas both work: Mini pitas are great for kids or individual servings, while regular pitas make a heartier meal.
  • Freezer-friendly: Assemble the pizzas without baking, freeze in a single layer, then transfer to freezer bags. Bake directly from frozen, adding a few extra minutes to the cooking time.
Want To save this Recipe?

Picture of One Potato

One Potato

One Potato is a community and newsletter written by real people who are parents, having real conversations about our families, cooking traditions, and cultures.

Healthy New Year Recipe

Subscribe Here

Want to be a guest writer ?

Check out our Community Voices Info Page, and get in touch.

Advertise with Us

One Potato is a community and newsletter written by real people who are parents, having real conversations about our families, cooking traditions, and cultures. We are passionate about raising healthy and happy kids while navigating the challenges of picky eaters, dietary restrictions, busy schedules, and daily life.