The Ultimate Festive, “No-Crumb-Left” Cookie Bar
When I say these are the perfect holiday cookie bars, just take my word for it! Holiday Chocolate Chip Sprinkle Bars are soft, chocolatey, and downright delicious. December is the month where cookies truly get their moment in the spotlight, and while I’m always on the hunt for the perfect Christmas treat, I’ve finally found my match. These bars are a breeze to make, even more fun to decorate, and I can guarantee there won’t be a single crumb left behind.
Why This Recipe Wins
- Festive & Customizable: While we love them for Christmas, you can swap the sprinkles to match any holiday—blue and white for Hanukkah, red and pink for Valentine’s Day, or even green for St. Patrick’s Day!
- Kid-Friendly Fun: This is the perfect recipe for little helpers. From cracking eggs to measuring out the “rainbow” of sprinkles, it’s a memory-making machine.
- Sprinkle Saver: It’s the best way to use up all those leftover jars of sprinkles from other baking projects.
- Effortless Batch Baking: No need to scoop individual cookies; just spread the dough in a pan, bake, and slice!
What You’ll Need
- All-Purpose Flour: Use organic, unbleached flour for the most tender, soft-baked results.
- Unsalted Butter: Start with room temperature butter for a smooth, creamy dough.
- Brown & White Sugar: The duo that creates the perfect balance of sweetness and chew.
- Eggs: A great chance for kids to practice their cracking skills!
- The “Mix-In” Party: Chocolate chips, M&Ms, and plenty of festive sprinkles.
How to Make It
- The Prep: Preheat your oven to 350°F. Line and grease a 9×13-inch baking dish.
- The Creaming: Use a mixer to cream the butter and both sugars until light.
- The Combine: Whisk your dry ingredients, then gradually add them to the butter mixture until the dough is smooth.
- The Fold: Stir in half of your chocolate chips, candy, and sprinkles.
- The Layer: Spread the dough evenly into the prepared pan.
- The “Pretty” Step: Press the remaining candy and sprinkles onto the top of the dough.Tip: Adding the mix-ins to the surface makes the bars look professionally decorated and vibrant!
- The Bake: Bake for 30 minutes until the edges are just golden. Let them cool for at least 15 minutes before slicing so they set perfectly.
Get the Kids Involved: The “Sprinkle Stylists”
This recipe is designed for family participation.
- Ages 3–5: Let them be the “Top Decorators.” Once the dough is in the pan, they can scatter the remaining sprinkles and chocolate chips over the surface.
- Ages 6–9: Have them help measure the ingredients. It’s a fun, practical way to use their math skills while “feeding” the stand mixer.
- Ages 10+: Let them lead the “Egg Crack Challenge.” With a separate small bowl (just in case of shells!), they can practice cracking the eggs for the batter.
Make It Your Own
- The “Candy Swap”: Love peanut butter? Swap the M&Ms for mini peanut butter cups. Want a more sophisticated vibe? Use dark chocolate chunks or discs instead of chips.
- Dye-Free Options: There are so many amazing dye-free sprinkles available now that look just as bright and festive as the traditional ones.
- Temperature Matters: Make sure your butter and eggs are truly at room temperature before you start. This ensures the dough emulsifies correctly and creates that melt-in-your-mouth texture.
- The Safety Trick: I love using a stand mixer with kids because it stays in one place. It’s easier to teach them to stay away from the moving parts when the machine isn’t being held by hand.
Serve & Savor
These bars are the hero of any holiday cookie jamboree. They are thick, chewy, and bursting with color.
Print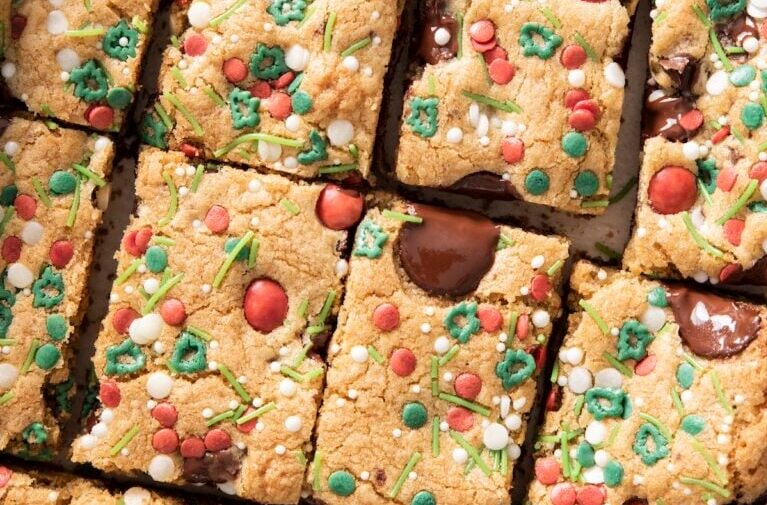
Holiday Chocolate Chip Sprinkle Bars
A high-yield, pan-baked cookie bar with balanced chew and structure. The dual-sugar system (brown + white) enhances moisture retention while promoting surface caramelization.
Ingredients
-
3 cups all-purpose flour
-
1 teaspoon baking soda
-
1 teaspoon salt
-
1 cup unsalted butter, softened
-
1 cup brown sugar
-
3/4 cup granulated sugar
-
2 large eggs
-
1 tablespoon vanilla extract
-
1 1/2 cups red and green chocolate-covered candies (divided)
-
3/4 cup chocolate chips, chunks, or discs (divided)
-
1/4 cup holiday sprinkles
Instructions
1. Prepare Pan & Oven
Preheat oven to 350°F (175°C).
Grease a 9 x 13-inch baking dish and line with parchment, leaving overhang for clean removal.
2. Dry Mix
Whisk flour, baking soda, and salt to ensure even leavening distribution.
3. Creaming Phase
Beat butter, brown sugar, and granulated sugar 3–5 minutes until light and creamy.
Add eggs and vanilla; mix until fully incorporated.
4. Combine
Add dry ingredients to wet mixture; mix just until combined (about 1 minute).
Fold in:
-
1 1/4 cups chocolate candies
-
1/2 cup chocolate chips
5. Pan & Finish
Spread evenly into prepared pan.
Top with remaining candies, chocolate chips, and sprinkles for visual distribution and surface texture.
6. Bake
Bake 30 minutes, or until top just begins to turn golden and center is set but soft.
7. Cool & Cut
Cool at least 15 minutes before lifting out and slicing into squares.
Notes
-
Room temperature ingredients: Ensure butter and eggs are at ambient temperature for proper emulsification.
-
Visual topping strategy: Reserve mix-ins for surface application to prevent visual sinkage during bake.
-
Texture control: For thicker bars, use a slightly smaller pan and extend bake time incrementally.
-
Storage: Airtight container at room temperature for 3–4 days; texture remains soft due to brown sugar’s hygroscopic properties.
This is a production-efficient holiday recipe—minimal shaping, uniform portioning, and strong shelf stability for gifting or events.