The “Push” Sandwich Worth Dreaming About
When you want to impress someone with your “incredible culinary skills”—or simply treat yourself after a monumental life event—whip up one of these ooey-gooey, delectable treats. Born from a very specific craving the night Chloe arrived, this isn’t just any peanut butter and jelly sandwich. It’s thick, sliced bread slathered with smooth peanut butter and fresh strawberry preserves, then pressed to “toasty perfection” in a waffle iron. If you’ve never had a PB&J made this way, you are missing out on a “tantalizing taste sensation” that is well-earned and “utterly luscious.”
Why This Recipe Wins
- Texture Heaven: The waffle iron creates deep pockets that trap the melted peanut butter and warm jelly, providing a “satisfying crunch” on the outside and a gooey center.
- Simple yet Impressive: It takes a childhood staple and elevates it into a sophisticated, “warm and gooey” dessert or decadent snack.
- Quick & Easy: You can have this “scrumptious” treat ready in less than five minutes—perfect for when those cravings hit “in a jiff.”
- Customizable: While strawberry preserves are a classic, you can swap in any fruit spread or even add a few banana slices for a “nutritious and delicious” twist.
What You’ll Need
- Thick Sliced Bread: Brioche or a sturdy sourdough works best to hold up to the pressure of the waffle iron.
- Smooth Peanut Butter: For that “velvety smooth” melt.
- Fresh Strawberry Preserves: To add a juicy, “sweet yet tart” burst of flavor.
- Butter: To coat the outside of the bread for a golden-brown finish.
- The Secret Tool: A waffle iron!
How to Make It
- The Assembly: Spread a generous layer of peanut butter on one slice of bread and a thick layer of strawberry preserves on the other.
- The Sandwich: Close them up to create your masterpiece.
- The Butter: Lightly butter the outside of both slices of bread. This ensures it doesn’t stick and gives you that “aesthetic beauty” of a golden crust.
- The Press: Place the sandwich into your preheated waffle iron.
- The Sizzle: Close the lid and press down gently. Cook for 2–3 minutes until the bread is toasted and the filling is starting to ooze out of the sides.
- The Serve: Carefully remove and let it sit for a minute (the filling will be hot!) before diving in.
Get the Kids Involved: The “Waffle Architects”
Since this is such a safe and “fun activity,” it’s a great way to get your little ones—including Chloe, the inspiration behind the recipe!—involved in the kitchen.
- Ages 3–5: Let them be the “Preserve Spreaders.” Using the back of a spoon, they can help spread the strawberry preserves across the bread, practicing their fine motor skills.
- Ages 6–9: Have them help “The Bread Butterers.” They can use a butter knife to coat the outside of the sandwich, learning the “science” of how butter helps with browning.
- Ages 10+: Let them lead the “Waffle Iron Watch.” Under your supervision, they can monitor the sandwich and decide exactly when it has reached “toasty perfection.”
Tips for Success
- Don’t Overfill: While it’s tempting to use “tons” of peanut butter, leaving a small margin at the edges of the bread will help keep the mess inside the “waffle pockets.”
- Heat Check: Make sure your waffle iron is nice and hot before you add the sandwich. This sears the bread quickly, keeping the inside “light and fluffy” while the outside gets crispy.
- Variation: Try using Banana Quinoa Rice Pudding flavors by adding sliced bananas and a sprinkle of cinnamon inside before pressing.
- Cleanup Tip: If any jelly leaks out, wipe the waffle iron while it’s still slightly warm (but not hot!) with a damp paper towel to make cleanup a breeze.
Serve & Savor
The Waffle Iron PB&J is more than just a sandwich; it’s a “holiday-level” treat that honors one of life’s most special moments. It proves that sometimes the “simplest tastes” are the ones that stay with us forever.
The World’s Greatest Peanut Butter and Jelly Sandwich
5 Stars 4 Stars 3 Stars 2 Stars 1 Star
No reviews
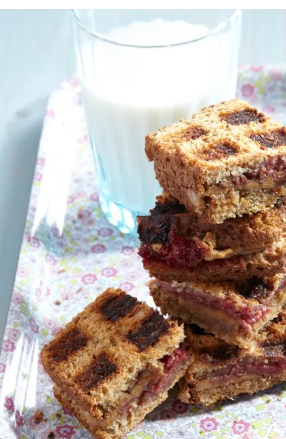
Crispy on the outside, warm and gooey on the inside—this elevated PB&J uses a waffle iron to transform a classic into a golden, melty masterpiece.
Ingredients
- 2 slices sandwich bread
- 2 tablespoons peanut butter
- 2 tablespoons preserves or jelly
- Butter (optional, for greasing)
Instructions
1. Preheat
- Preheat your waffle iron.
2. Assemble the Sandwich
- Spread peanut butter on one slice of bread.
- Spread preserves on the other slice.
- Press together to form a sandwich.
3. Prepare the Waffle Iron
- Lightly butter the waffle iron (optional for extra crispiness and flavor).
4. Cook
- Place the sandwich in the waffle iron and close.
- Cook for 4–5 minutes, until:
- Bread is golden and crisp
- Filling is warm and slightly oozing
5. Serve
- Carefully remove and let cool slightly before slicing or serving.
Notes
- Don’t overfill: Prevents excessive leakage
- Seal edges slightly: Pressing the bread helps contain filling
- Watch closely: Waffle irons vary in heat intensity
- Author: Miks


