
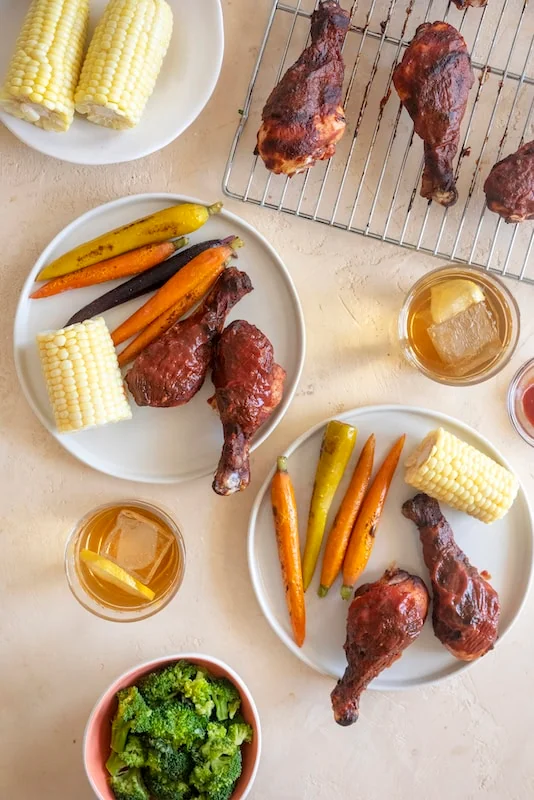
The “Sticky & Zippy” Baked BBQ Chicken Legs
When you’re tasked with satisfying barbecue cravings for a healthy, “chicken-loving” family without relying on store-bought sauces packed with corn syrup, sometimes the best solution is an economical, oven-roasted classic. These Baked BBQ Chicken Legs combine juicy drumsticks with your favorite perfectly balanced, zippy BBQ sauce right at home. It’s a “wholesome” twist that had the in-house testers absolutely thrilled—to the point where one could barely hear a muffled “pass another drumstick” through bites of sticky, savory goodness!
Why This Recipe Wins
- Budget Power: By utilizing chicken legs—one of the most economical cuts of meat—the recipe provides a “filling and tasty” dinner that feeds the whole crew on a budget.
- Dinner Surprise: Moving away from a “standard tedious routine” of plain roasted chicken turns an ordinary weeknight into a “special holiday” event starring an irresistible sticky glaze.
- Naturally Sweet & Tangy: Balancing the savory chicken with a sauce that has just the right amount of vinegar zing and a slight kick provides a “rich yet robust” flavor profile without being overly peppery or sugary.
- Quick-Roast Ease: These “kid-approved portions” are practically effortless to throw onto a baking sheet, making them an ideal choice for a hearty dinner that’s on the table in less time than you’d think.
What You’ll Need
- The Economical Protein: Chicken legs (drumsticks), patted dry for maximum roasting potential.
- The Savory Seasoning: Olive oil, kosher salt, black pepper, and a touch of garlic powder or smoked paprika to rub on the skin.
- The Zippy Glaze: Your favorite homemade BBQ sauce, or a high-quality store-bought bottle (made without high-fructose corn syrup!).
- The Perfect Sides: Ingredients for Sweet Potato Dippers, Everything Kale Chips, Roasted Carrot Coins, or fresh steamed corn.
How to Make It
- The Dry Prep: Pat the chicken legs dry with paper towels so the skin doesn’t remain soft and steamy, ensuring it can become “perfectly crisp” in the hot oven.
- The Oil Toss: Toss the drumsticks in olive oil and seasonings “thoroughly, but gently” until the coating looks completely “velvety smooth” and evenly distributed.
- The Golden Roast: Bake the chicken on a foil-lined baking sheet until cooked through and the skin takes on a gorgeous, caramelized “golden-brown” finish.
- The Sticky Baste: During the last few minutes of baking, brush the legs generously with your BBQ sauce, returning them to the oven for 5 minutes until the sauce becomes bubbly and deeply caramelized.
- The Plate: Serve warm alongside steamed corn or roasted carrots for a lip-smacking, “mess-proof” masterpiece! (Well, maybe keep a napkin handy!)
Get the Kids Involved: The “BBQ Squad”
Since brushing on sauces is super interactive, this is a “ton of fun” for kids to help assemble and enjoy.
- Ages 3–5: Let them be the “Corn Huskers.” They can help peel the husks off the fresh ears of steamed corn for the side dish, practicing their “precision.”
- Ages 6–9: Have them help as “The BBQ Brushers.” Show them how using a silicone pastry brush to paint the sauce onto the chicken creates a “scrumptious” and perfectly even sticky glaze.
- Ages 10+: Let them lead the “Chicken Seasoning.” Under supervision, they can toss the raw chicken legs in the oil and spices, looking for the “magic sizzle” as the tray hits the hot oven.
Tips for Success
- Double the Sauce: If you only baste the chicken once, you might miss out on that classic sticky coating. Brushing the legs with sauce, baking for a few minutes, and brushing again is imperative to achieve that “tender and rich” bite with maximum flavor.
- Foil is Your Friend: The goal is easy cleanup, so lining your baking sheet with aluminum foil or parchment paper ensures the cleanup stays “refreshing and light” even after the sugars in the BBQ sauce caramelize and burn on the pan.
- The Leftover Trick: One can make a “huge batch” of these drumsticks on Sunday, storing the leftovers in the fridge so you have a “quick and easy” protein ready for lunchboxes all week long!
Dinner Note: Let the sauce do the work! Finding a great quality store-bought BBQ sauce makes throwing this economical dinner together a “quick and easy” win that everyone will devour.
- Variation: For a “decadent and indulgent” twist, serve these with homemade macaroni and cheese, or explore other zippy family favorites from our barbecue rotation like Lazy BBQ Chicken, Shredded BBQ Chicken Sammies, BBQ Chicken Burgers, Crock Pot Ribs, or Crock Pot BBQ Chicken to elevate your cookout menu even further.
Serve & Savor
The Baked BBQ Chicken Legs are a “tantalizing taste sensation” that proves budget-friendly meals can be “out of this world” delicious and universally loved. It’s a “versatile” recipe that turns humble drumsticks into a “memory-making” family favorite.
Baked BBQ Chicken Legs
5 Stars 4 Stars 3 Stars 2 Stars 1 Star
No reviews
These oven-baked chicken legs are coated in a homemade sweet and tangy BBQ sauce, making a delicious, family-friendly meal.
- Total Time: 1 hour 30 minutes
- Yield: 4 servings (2 pounds chicken legs)
Ingredients
-
1 cup organic ketchup
-
1/3 cup packed dark brown sugar
-
2 tablespoons apple cider vinegar
-
2 tablespoons Worcestershire sauce
-
2 garlic cloves, minced
-
1 teaspoon paprika
For the Chicken Legs
-
1 teaspoon kosher salt
-
2 pounds chicken legs
-
Additional BBQ sauce for basting, if desired
Instructions
-
Prepare the BBQ sauce. In a small saucepan over medium heat, combine the ketchup, brown sugar, apple cider vinegar, Worcestershire sauce, minced garlic, and paprika.
-
Simmer until thickened. Bring the mixture to a boil, stirring frequently. Reduce the heat to low and simmer for 2–3 minutes, until the sauce thickens slightly.
-
Cool the sauce. Remove the saucepan from the heat and allow the BBQ sauce to cool. Transfer to an airtight container if preparing ahead.
-
Preheat the oven. Set the oven to 375°F.
-
Season the chicken. Place the chicken legs in a large mixing bowl and sprinkle with kosher salt.
-
Coat and marinate. Add 1/2 cup of the cooled BBQ sauce and toss until the chicken is evenly coated. Cover and refrigerate for 30 minutes.
-
Prepare the baking sheet. Line a baking sheet with aluminum foil and place a baking rack on top.
-
Arrange the chicken. Remove the chicken from the marinade and arrange the legs on the rack in a single layer. Discard any marinade that has touched raw chicken.
-
Bake. Roast for approximately 45 minutes, basting with fresh BBQ sauce if desired. Cooking time may vary depending on the size of the chicken legs.
-
Check for doneness. Use a meat thermometer to confirm the thickest part of each chicken leg reaches 165°F, avoiding contact with the bone. If needed, continue baking until fully cooked.
-
Rest and serve. Let the chicken rest briefly before serving with additional BBQ sauce on the side.
Notes
-
Marinate for flavor: The 30-minute marinade helps the BBQ sauce season the chicken before baking.
-
Use a baking rack: Elevating the chicken allows hot air to circulate around the legs for more even roasting.
-
Keep sauce separate: Set aside fresh BBQ sauce for basting and serving before adding any sauce to raw chicken.
-
Avoid burning: The brown sugar in the sauce can caramelize quickly. If the chicken browns too much before it is cooked through, loosely cover it with foil.
-
Check each piece: Chicken legs can vary in size, so check the temperature of several pieces rather than relying only on cooking time.
- Author: Miks
- Prep Time: 10 minutes
- Marinate: 30 minutes
- Cook Time: 50 minutes
- Category: Main Dish
- Cuisine: American











0 comments on “Baked BBQ Chicken Legs”Add yours →